![]()
Obtaining a “free” development system for ARM and Cortex CPUs for Windows 7 x64.
Most of the free tools are principally written for Linux, for perhaps obvious reasons. Making a tool set work for Windows is no easy task, and this was one reason why Yagarto created his. An overview of what to download and install is at http://www.yagarto.de/howto/yagarto1/index.html
1 Getting the files:
Take a look at the Yagarto Website http://www.yagarto.de/
Download Yagarto Tools on this webpage, the Yagarto GNU ARM Toolchain and the Eclipse CDT Integrated Development Environment.
We need to download OpenOCD which is an on-chip debugger. For this we use Freddie Chopin’s website to obtain Window binaries. http://www.freddiechopin.info/en/download/category/4-openocd and download OpenOCD 0.6.0
I use an affordable Olimex ARM-USB-TINY-H USB JTAG, and for this we need to download the drivers. The ones chosen are for are Drivers for working with OpenOCD 0.4.0. which can be found on this webpage https://www.olimex.com/Products/ARM/JTAG/ARM-USB-TINY-H
2 Yagarto GNU ARM Toolchain:
Because of Linux limitations it is best to choose directory names which don’t have spaces or brackets. So don’t install anything in Program Files (x86)!
Run the Yagarto GNU ARM Toolchain and when prompted install into a directory of your choice. I chose C:\Yagarto This will leave a standalone set of tools. Check that the path contains: C:\Yagarto\bin by typing path at a command prompt.
If you don’t have the make utility, run the Yagarto Tools installer. I chose C:\Yagarto to ensure I had a standalone set of tools. This adds the necessary files like make.exe which we will test later. Check that the path contains: C:\Yagarto\yagarto-tools-20100703\bin by typing path at a command prompt.
It is a good idea to ensure that the toolchain works independently by downloading an example. I have an LPC2378 PCB and so use this simple project: LPC-2378_blink_FLASH We can run the LPC2378.bat file to clean and build the project. When we run the batch file we should see:
C:\Designs\ LPC-2378_blink_FLASH>arm-none-eabi-gcc --version
arm-none-eabi-gcc (GCC) 4.7.1
Copyright (C) 2012 Free Software Foundation, Inc.
This is free software; see the source for copying conditions. There is NO
warranty; not even for MERCHANTABILITY or FITNESS FOR A PARTICULAR PURPOSE.
C:\Designs\STR7Test>pause
Press any key to continue . . .
C:\Designs\STR7Test>make clean
rm -f ./src/crt.o ./src/main.o
rm -f test_rom.elf
rm -f test_rom.map
rm -f test_rom.hex
rm -f test_rom.bin
rm -f ./src/main.c.bak
rm -f ./src/main.lst
rm -f ./src/crt.s.bak
rm -f ./src/crt.lst
rm -fR .dep
C:\Designs\STR7Test>pause
Press any key to continue . . .
If we don’t see the above then make.exe cannot be found, the environment path has not been added or there are some “illegal” characters in the directory name. After the next keypress we should build the project and find additional .hex, .elf and .bin files in the project directory
3 OpenOCD and GDB
Next we need to install OpenOCD. Normally these have to run under CygWin but Freddie Choppin’s website has Windows binaries we can download. http://www.freddiechopin.info/en/download/category/4-openocd There are other precompiled versions available. Place the openocd-x.x.x directory under Our Yagarto directory. The OpenOCD is regarded as a finicky application and a user manual can be found at http://openocd.sourceforge.net/doc/pdf/openocd.pdf
Install the drivers for the ARM-USB-TINY-H by downloading the zipped drivers for working with OpenOCD 0.4.0 which can be found on the Olimex webpage https://www.olimex.com/Products/ARM/JTAG/ARM-USB-TINY/ The README.txt is an installation guide. Plug in the ARM-USB-TINY-H and select the olimex-libusb-1.2.2.0 directory when it asks for the installation files. If there any problems it is possible to use Device Manager and manually update Olimex USB JTAG TINY device with the above driver.
Examples can be found in the examples director of the OLIMEX ARM DEVELOPMENT PACKAGE V1.1 on the above webpage, or for each of the Olimex prototype boards. However the projects are for an older version of OpenOCD and various commands in the cfg files have been deprecated and will need to be modified.
The way OpenOCD works is not intuitive, in essence the OpenOCD program creates an interface where the GDB (arm-none-eabi-gdb) application provides the command interface. Another CMD Prompt window can be used to telnet commands to OpenOCD where we can erase and program the device. The GDB window can debug the program.
An issue exists regarding checksums calculated by the GCC linker and that calculated by OpenOCD to be value stored in the Interrupt Vector table. While this is an annoyance rather than producing a critical failure, it can be calculated off-line on the binary file by lpcrc.exe . lpcrc.exe must be copied to a director like C:\Yagarto\bin so that the program can be found in the executable path.
Create a batch file called lpcrc.bat to process the bin file to contain the correct checksum. This can be used with applications like FlashMagic.
Run the OpenOCD.bat batch batch file and then the GDB.bat batch file
Open a CMD Prompt and type the following:
telnet localhost 4444
We should get a Open On-Chip Debugger prompt, type the following:
reset halt
It is useful to have this window to reset the CPU as the GDB window is not available when the processor is running.
For debugging with GDB, type
target remote localhost:3333
load – to load the elf file
b main – to set a breakpoint at main
c – to run to breakpoint at main{}
Here we can begin to single step and debug the program. We can modify values in registers, and even restart the program using:
set $pc = 0
and step, stepi commands.
For more information take a look at the OpenOCD and GDB User’s Guides.
4 Eclipse
In order to install Eclipse CDT we must first ensure we have the Java SE run-time platform. This can be confirmed by running typing java –version at a Command Prompt and Java SE can be also be downloaded from http://www.oracle.com/technetwork/java/javase/downloads/index.html
Eclipse CDT can be found at http://www.eclipse.org/cdt/ Unzip and place the Eclipse directory in the Yagarto directory. Make a shortcut of Eclipse.exe in this directory and copy this onto the Desktop and Start menu as per your preferences.
Run Eclipse and choose a directory to be the working directory, which is above the “LPC-2378_blink_FLASH” directory. Delete the welcome screen.
The FreeRTOS website has an article on how to install the Eclipse development environment This is for a slightly older version of Eclipse. Instead of “Find and Install” on the “Help”, select “Install New Software”
In the “Work with” panel, enter http://download.eclipse.org/tools/cdt/releases/juno Click on “Add”, and place a meaningful name in the Name panel “Required for JTAG debugging” to obtain the following:
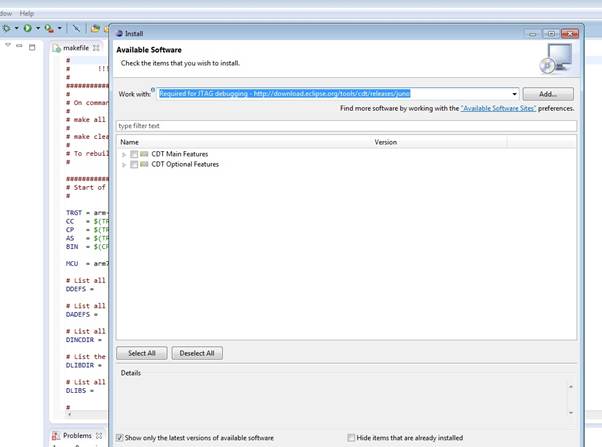
If you are using an alternative version of Eclipse, the last name of the URL must have this name.
Select “Eclipse C/C++ GDB hardware debugging”:

Install the software and restart Eclipse.
Further information can be found on the ethernut website; the rest of eclipse is relatively easy to setup:
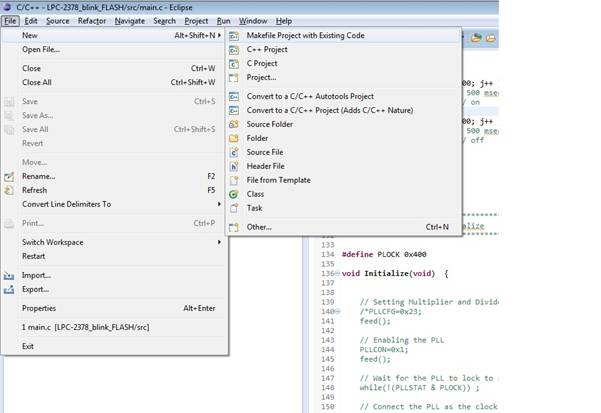
Make a new Makefile Project with Existing Code as per:
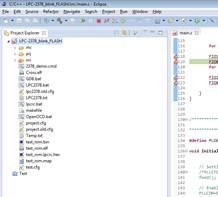
The Eclipse Project Explorer should show the files in the Project directory like so:
We can now setup the GDB interface:
On the menu click on Run>Debug Configurations
On GDB Hardware Debugging click on the New button and complete the frame like so:
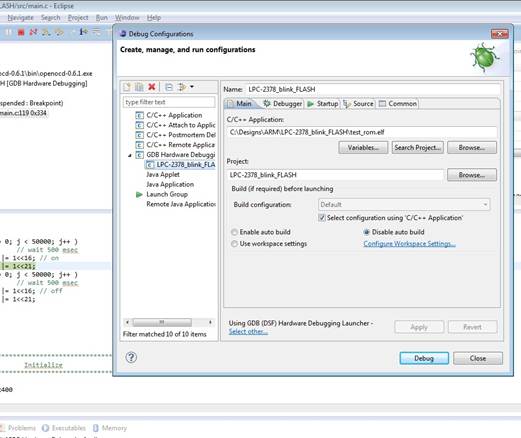
And click on Apply, For the Debugger tab:

Enter the GDB executable details and the host and port details before clicking on Apply. On the Startup tab:
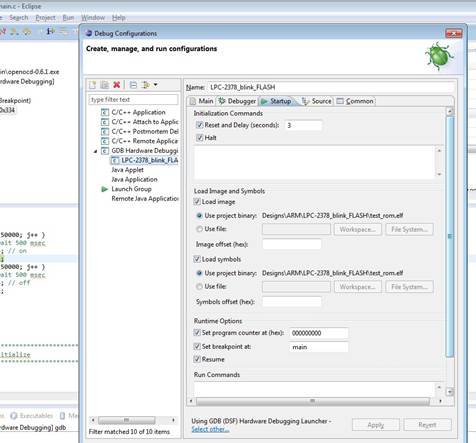
Set the start address and main for the startup temporary breakpoint. Enable Resume by ticking the box. Click on Apply.
 |
The GDB side has now ben setup. It is possible to prove this works by clicking on OpenOCD.bat mentioned above, and debugging this program in eclipse. It is wise to ensure that GDB works in this manner before proceeding to add OpenOCD to Eclipse.
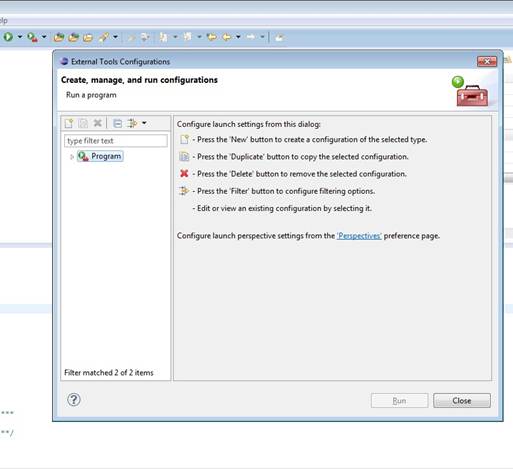
We must now add the OpenOCD application. Click on External tools, the green toolbar button with a red toolbox to open the External Tools Configuration dialogue:
Create a new configuration and complete as per:
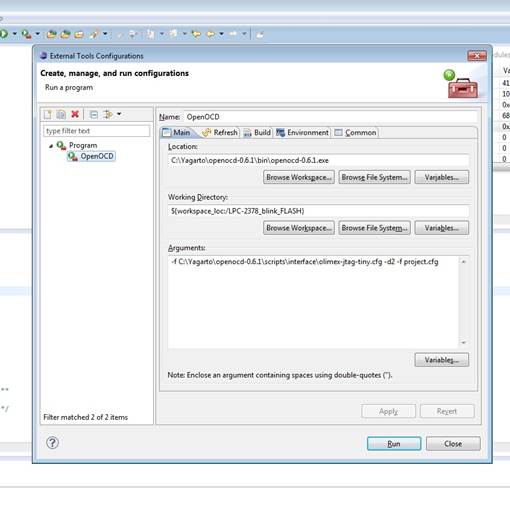
Copy and paste the contents of the OpenOCD.bat file into the arguments box. Our prior testing will hopefully ensure that this supplication runs successfully under eclipse.
Click on Apply to save the dialog box and run if we wish to debug our project.
5 Conclcusion
We now have a working ARM IDE suite with debug and trace facilities.
There are 3 steps to debug a project:
1 Build – use the Project>Build All to create the project files we need
2 Run OpenOCD from the External Tools Icon
3 On the Bug Icon click on LPC-2378_blink_FLASH to start debugging
It is useful to note that most of the commands are under the Run menu. One trick of restarting the program is to set the pc register to 0x0000 to mimic starting from a reset condition.